
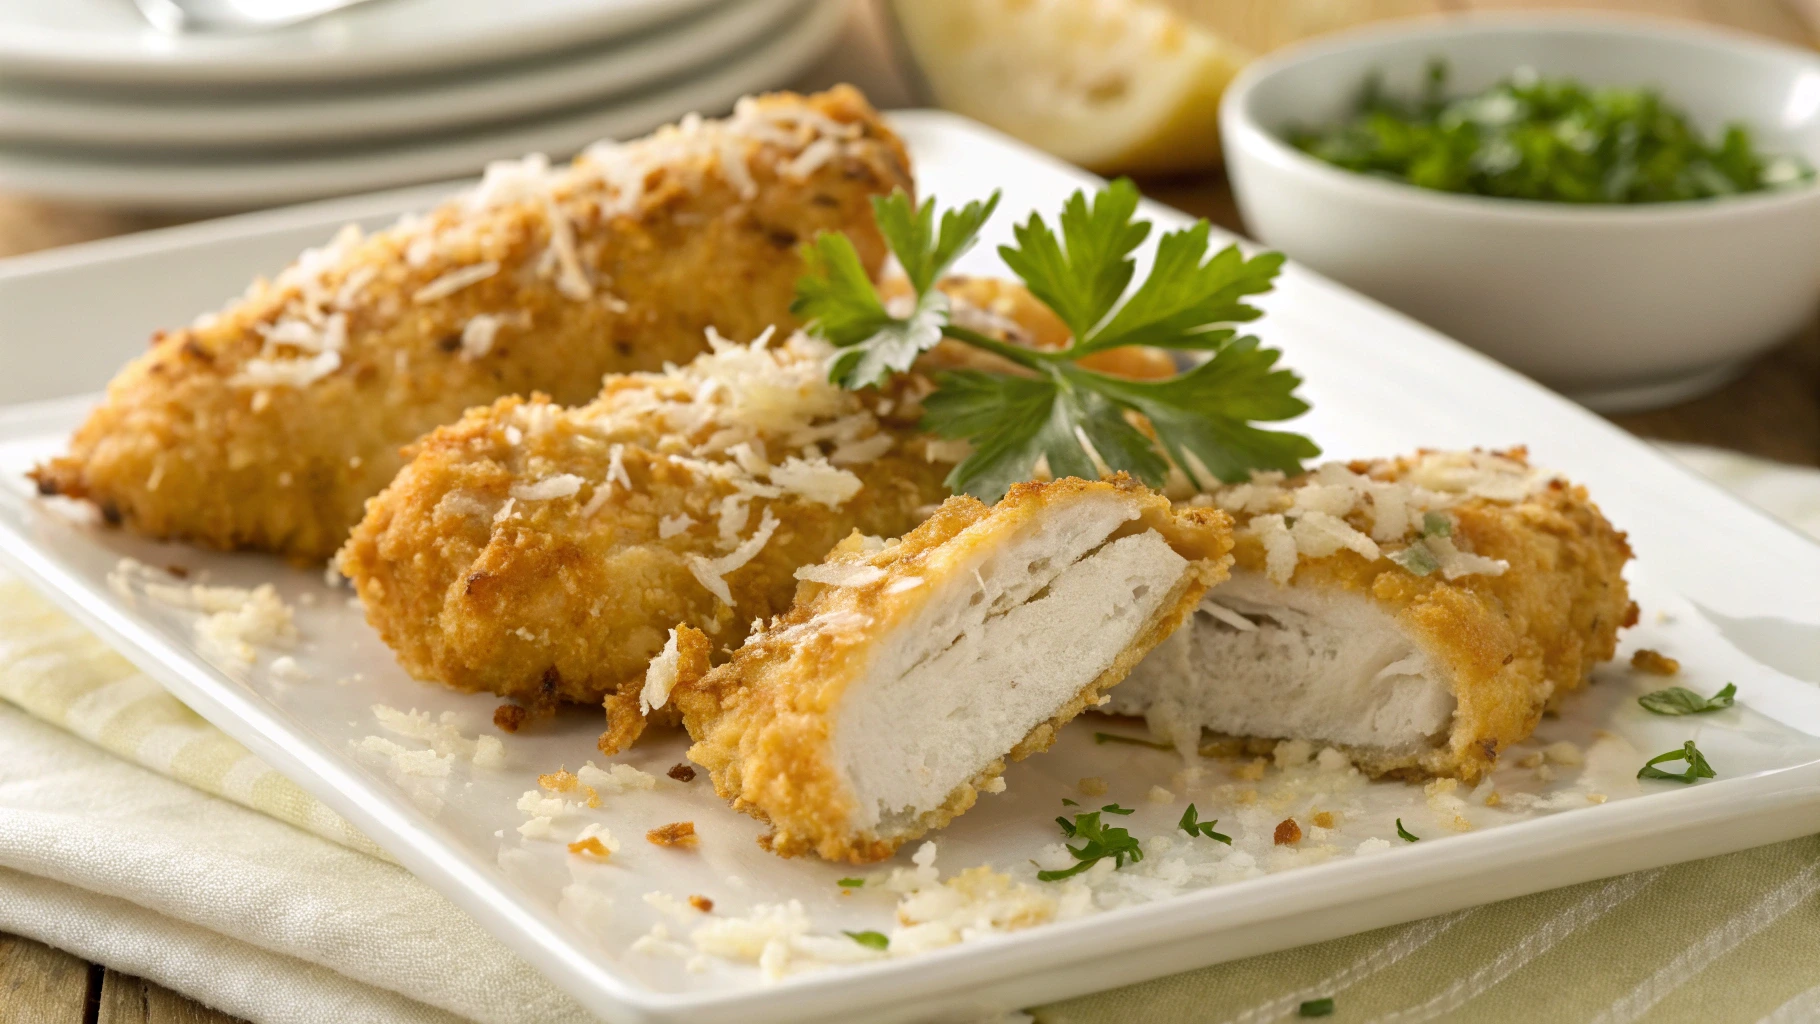
Have you ever craved restaurant-quality chicken tenders but wanted something healthier and more exciting than the usual breaded version? These perfectly crispy coconut chicken tenders are about to become your new obsession!
There’s something magical about that golden, flaky coconut coating that delivers an incredible crunch with every bite. What makes this recipe truly special is how easy it is to achieve that coveted crispy texture without deep frying. Whether you’re cooking for picky kids or hosting a dinner party, these tender, juicy chicken strips wrapped in a crunchy coconut coating never fail to impress.
I love how this family-friendly recipe transforms simple chicken breast into something extraordinary in just 20 minutes. The secret lies in the three-step coating process that creates layers of flavor and texture – resulting in chicken tenders that are crispy on the outside and impossibly tender inside.
Ready to discover why homemade coconut chicken tenders beat takeout every time? Let’s dive into this protein-packed recipe that’s about to revolutionize your weeknight dinner game!
Table of Contents
Key Benefits
Why should you choose coconut chicken tenders over traditional breaded versions? Let me share the incredible advantages that make this recipe a total game-changer for your kitchen!
Health-Conscious Choice Without Sacrifice Unlike heavy, oil-soaked chicken tenders from restaurants, this healthy cooking method delivers maximum crunch with minimal guilt. The coconut coating creates natural crispiness without deep frying, making it a protein-rich meal that fits perfectly into your wellness goals.
Effortless Weeknight Solution Picture this: you walk through the door after a long day, and within 20 minutes, you’re serving restaurant-quality chicken tenders that everyone loves. This easy weeknight dinner requires just simple ingredients and basic kitchen skills – no complicated techniques or specialty equipment needed.
Family-Friendly Winner
- Kid-approved taste that gets even picky eaters excited about dinner
- Gluten-free option when using certified coconut flakes
- Customizable heat levels to suit everyone’s preferences
- Make-ahead friendly for busy parents planning meals
Budget-Smart Alternative Transform affordable chicken breast into something that tastes like an expensive restaurant dish. You’ll save money while controlling exactly what goes into your family’s food – no mystery ingredients or preservatives here!
The bottom line? These coconut chicken tenders prove that healthy, homemade, and absolutely delicious can all happen in one amazing recipe.
Ingredients

Ready to create magic with just a handful of simple ingredients? The beauty of this coconut chicken tenders recipe lies in its simplicity – you probably have most of these items in your kitchen right now!
For the Chicken:
- 2 lbs boneless, skinless chicken breasts – Look for evenly thick pieces for consistent cooking
- 1 tsp salt – This draws out moisture and enhances flavor
- ½ tsp black pepper – Freshly ground tastes best
- 1 tsp garlic powder – Adds that savory depth we all crave
For the Crispy Coating:
- 1 cup all-purpose flour – Creates the foundation for our coating system
- 2 large eggs, beaten – The “glue” that makes everything stick perfectly
- 2 cups shredded coconut (sweetened or unsweetened) – The star ingredient for that golden crispy coating
- 1 cup panko breadcrumbs – These create extra crunch and volume
- Cooking spray or light oil – Just enough to help browning
Pro Ingredient Tips: Coconut choice matters! Unsweetened coconut flakes give you more control over flavor, while sweetened adds a subtle tropical sweetness that kids absolutely love. Either works beautifully.
Fresh vs. frozen chicken? Fresh chicken breast gives you the juiciest results, but if using frozen, make sure it’s completely thawed and patted dry before seasoning.
Here’s the secret: Room temperature chicken cooks more evenly than cold-from-the-fridge chicken. Take it out about 15 minutes before you start cooking – your tender chicken breast will thank you!
How to Make: Perfectly Crispy Coconut Chicken Tenders
Ready to create restaurant-worthy chicken tenders in your own kitchen? Follow this step-by-step process and you’ll have golden brown perfection every single time!
Step 1: Prep Your Chicken (5 minutes) Start by slicing your chicken breast strips into even tender-sized pieces – about ½ inch thick and 3-4 inches long. Here’s the key: uniform sizing ensures everything cooks at the same rate. Pat each piece completely dry with paper towels, then season generously with salt, pepper, and garlic powder. Let them sit for 5 minutes while the seasoning works its magic.
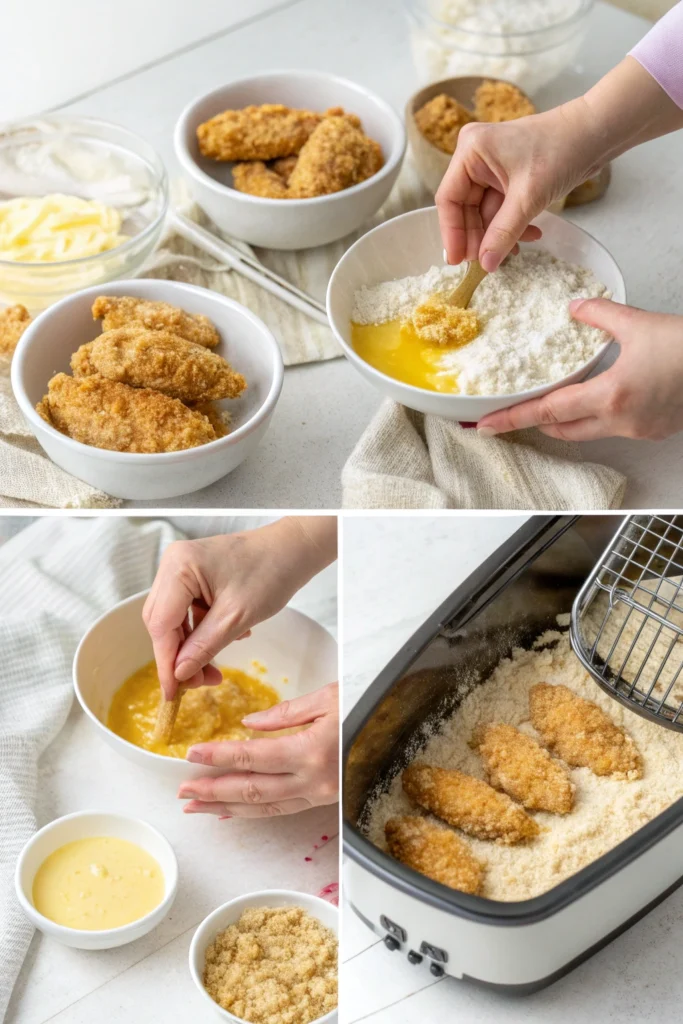
Step 2: Set Up Your Coating Station Create your three-step breading process using three shallow dishes:
- Station 1: All-purpose flour
- Station 2: Beaten eggs
- Station 3: Mix together shredded coconut and panko breadcrumbs
Pro tip: Keep one hand for dry ingredients and one for wet – this prevents the dreaded “breading fingers” that make everything clumpy!
Step 3: The Coating Magic Now comes the fun part! Take each chicken strip through this coating journey:
- Dredge in flour – shake off excess
- Dip in beaten egg – let excess drip off
- Press into coconut mixture – really press it in for maximum coverage
Step 4: Cook to Crispy Perfection Air Fryer Method: Preheat to 400°F. Spray basket with cooking oil, arrange tenders without touching, and cook 8-10 minutes, flipping halfway through.
Oven Method: Preheat to 425°F. Place on wire rack over baking sheet, spray lightly with oil, and bake 12-15 minutes until internal temperature reaches 165°F.
You’ll know they’re perfect when the coating is golden crispy and the chicken feels firm but springy to touch!
Pro Tips and Variations
Want to take your coconut chicken tenders from good to absolutely incredible? These expert techniques and creative twists will help you master this recipe like a seasoned chef!
Temperature Control Secrets The golden rule: Use a meat thermometer! Your chicken is perfectly done at 165°F internal temperature – no guessing required. Here’s what I’ve learned: if your coating browns too quickly, lower the temperature by 25°F and cook a few minutes longer. This ensures your juicy chicken breast cooks through without burning that beautiful coconut coating.
Coating Perfection Tips
- Double-dip magic: For extra-thick coating, repeat the egg and coconut steps twice
- Let it rest: After coating, let tenders sit for 5 minutes before cooking – this helps everything adhere better
- Oil spray technique: Light, even coverage prevents soggy spots while promoting that golden crispy texture
Flavor Variations to Try Spicy Kick: Add ½ tsp cayenne pepper and 1 tsp paprika to your coconut mixture – perfect for heat lovers!
Tropical Twist: Mix in 2 tbsp finely chopped macadamia nuts with your coconut for extra crunch and island vibes.
Herb-Crusted: Blend in 1 tsp dried herbs like thyme or oregano for a more sophisticated flavor profile.
Storage and Reheating Wisdom Make-ahead friendly: Coat tenders up to 4 hours in advance and refrigerate. Cook fresh when ready to serve.
Leftover magic: Reheat in air fryer at 350°F for 3-4 minutes to restore that crispy exterior. Skip the microwave – it makes coating soggy!
Batch cooking tip: Double the recipe and freeze half after coating but before cooking. They keep for up to 3 months and cook straight from frozen (add 2-3 extra minutes).
The secret to success? Don’t overcrowd your cooking space – give each tender room to crisp up beautifully!
Serving Suggestions
Now that you’ve created these gorgeous coconut chicken tenders, let’s talk about turning them into an unforgettable meal! The right complementary sides and sauce pairings can transform your dinner from great to absolutely spectacular.
Perfect Dipping Sauces Sweet & Tangy Options:
- Honey mustard – The classic choice that never disappoints
- Sweet chili sauce – Adds a gentle kick with tropical sweetness
- Pineapple dipping sauce – Blend mayo, crushed pineapple, and a touch of lime juice for island vibes
Creamy Favorites:
- Ranch dressing – Kids’ ultimate favorite that adults secretly love too
- Garlic aioli – Mix mayo, minced garlic, and lemon juice for sophisticated flavor
- Coconut curry dip – Combine Greek yogurt with curry powder and shredded coconut
Side Dish Champions Light & Fresh Pairings: Transform this into a complete meal with crisp coleslaw or a vibrant mixed greens salad. The cool, crunchy vegetables perfectly balance the warm, crispy chicken tenders.
Hearty Comfort Options:
- Sweet potato fries – Bake alongside your tenders for easy timing
- Coconut rice – Keeps the tropical theme going strong
- Roasted vegetables – Colorful bell peppers and zucchini add nutrition and visual appeal
Presentation Ideas Family-style serving: Arrange tenders on a large platter with small bowls of different sauces – let everyone customize their perfect bite!
Individual plates: Serve 3-4 tenders per person with a small side salad and your chosen dipping sauce in a ramekin.
The finishing touch? A sprinkle of fresh herbs like chopped cilantro or parsley adds color and freshness that makes your family-friendly dinner look restaurant-quality!
Conclusion
There you have it – your complete guide to creating perfectly crispy coconut chicken tenders that’ll have everyone asking for seconds! This easy coconut chicken recipe proves that you don’t need complicated techniques or expensive ingredients to make something truly special in your own kitchen.
What makes this recipe a real winner? It’s the perfect balance of simplicity and impressive results. In just 20 minutes, you’ve transformed basic chicken breast into a restaurant-quality meal that’s healthier, more budget-friendly, and infinitely more satisfying than anything you’d order for delivery.
The best part? Once you master this three-step coating process, you’ll find yourself experimenting with different flavors and making this family-friendly recipe your own. Whether it’s a busy weeknight when you need something quick and reliable, or a weekend when you want to treat your loved ones to something special, these tenders deliver every single time.
Your kitchen success story starts here. The golden, crispy coconut coating, the tender, juicy chicken inside, and the smiles around your dinner table – that’s what homemade cooking is all about.
Ready to make this your new go-to dinner? Grab those ingredients, fire up your air fryer or oven, and get ready to discover why these coconut chicken tenders are about to become the most requested meal in your house. Trust me, once you taste that perfect crunch paired with incredibly tender chicken, you’ll never look at ordinary chicken tenders the same way again!
Happy cooking, and enjoy every crispy, delicious bite!
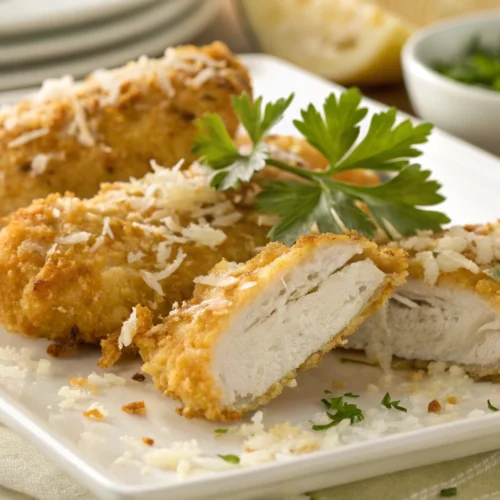
Perfectly Crispy Coconut Chicken Tenders
Ingredients
For the Chicken Base:
- 2 lbs boneless skinless chicken breasts (look for even thickness)
- 1 tsp salt
- ½ tsp black pepper freshly ground preferred
- 1 tsp garlic powder
For the Coconut Coating:
- 1 cup all-purpose flour foundation layer
- 2 large eggs beaten (room temperature)
- 2 cups shredded coconut sweetened or unsweetened
- 1 cup panko breadcrumbs extra crunch
- Cooking spray or light oil for browning
Instructions
Step 1: Prep the Chicken (5 mins)
- Slice chicken into ½-inch thick, 3-4 inch long strips
- Pat completely dry with paper towels
- Season generously with salt, pepper, garlic powder
- Let rest 5 minutes for seasoning penetration
Step 2: Three-Station Coating Setup (3 mins)
- Station 1: All-purpose flour in shallow dish
- Station 2: Beaten eggs
- Station 3: Mixed coconut and panko breadcrumbs
- Pro Tip: Keep hands separate (one dry, one wet)
Step 3: Coating Process (7 mins)
- Dredge in flour, shake off excess
- Dip in beaten egg, let excess drip
- Press into coconut mixture for maximum coverage
- Optional: Double-dip for extra thick coating
Step 4: Cook to Perfection (12-15 mins)
- Air Fryer Method: 400°F, 8-10 minutes, flip halfway
- Oven Method: 425°F, 12-15 minutes until 165°F internal
- Success Indicator: Golden crispy coating, firm but springy texture
Notes
Total Fat: 12g
Saturated Fat: 8g
Trans Fat: 0g
Cholesterol: 85mg
Sodium: 380mg
Total Carbohydrates: 18g
Dietary Fiber: 4g
Total Sugars: 6g
Added Sugars: 0g
Protein: 28g
Iron: 1.5mg
Vitamin E: 2.1mg
Potassium: 420mg
Magnesium: 45mg
FAQs
Question 1: Can I make these coconut chicken tenders gluten-free?
Absolutely! Simply swap the all-purpose flour for your favorite gluten-free flour blend or almond flour. The coconut and panko coating creates most of the crunch anyway, so you won’t miss a thing. Just make sure your panko breadcrumbs are certified gluten-free too!
Question 2: My coating isn’t staying on during cooking. What am I doing wrong?
This usually comes down to moisture! Pat your chicken breast strips completely dry before seasoning, and let the coated tenders rest for 5 minutes before cooking. Also, resist the urge to flip too early – let that crispy coating set properly first.
Question 3: Can I prep these ahead of time for meal planning?
You bet! Coat your tenders completely, then store them covered in the refrigerator for up to 4 hours before cooking. For longer make-ahead friendly prep, freeze them after coating but before cooking – they’ll keep for up to 3 months.
Question 4: What’s the best way to reheat leftover coconut chicken tenders?
Skip the microwave! Pop them back in your air fryer at 350°F for 3-4 minutes, or use your oven at 375°F for 5-6 minutes. This restores that golden crispy texture we all love.
Question 5: Can I use chicken thighs instead of breasts?
Definitely! Boneless chicken thighs work wonderfully and stay extra juicy. Just adjust your cooking time to ensure they reach that safe internal temperature of 165°F.
Question 6: My family doesn’t like coconut. Any substitutions?
Try crushed cornflakes, finely chopped nuts, or extra panko breadcrumbs mixed with parmesan cheese. You’ll still get that satisfying crunchy exterior with different flavor profiles!
Got questions about making these amazing coconut chicken tenders? You’re not alone! Here are the most common questions I get from fellow home cooks, along with tried-and-true solutions that’ll set you up for success.
Question 1: Can I make these coconut chicken tenders gluten-free? : Absolutely! Simply swap the all-purpose flour for your favorite gluten-free flour blend or almond flour. The coconut and panko coating creates most of the crunch anyway, so you won’t miss a thing. Just make sure your panko breadcrumbs are certified gluten-free too!
Question 2: My coating isn’t staying on during cooking. What am I doing wrong? : This usually comes down to moisture! Pat your chicken breast strips completely dry before seasoning, and let the coated tenders rest for 5 minutes before cooking. Also, resist the urge to flip too early – let that crispy coating set properly first.
Question 3: Can I prep these ahead of time for meal planning? : You bet! Coat your tenders completely, then store them covered in the refrigerator for up to 4 hours before cooking. For longer make-ahead friendly prep, freeze them after coating but before cooking – they’ll keep for up to 3 months.
Question 4: What’s the best way to reheat leftover coconut chicken tenders? : Skip the microwave! Pop them back in your air fryer at 350°F for 3-4 minutes, or use your oven at 375°F for 5-6 minutes. This restores that golden crispy texture we all love.
Question 5: Can I use chicken thighs instead of breasts? : Definitely! Boneless chicken thighs work wonderfully and stay extra juicy. Just adjust your cooking time to ensure they reach that safe internal temperature of 165°F.
Question 6: My family doesn’t like coconut. Any substitutions? : Try crushed cornflakes, finely chopped nuts, or extra panko breadcrumbs mixed with parmesan cheese. You’ll still get that satisfying crunchy exterior with different flavor profiles!